


Step 1
Create a new document and fill it with white. You can start with your own settings but set the width larger than the height ( mine is 1300×1000 px).Duplicate this background layer. Go to Filter-Distort-Lens Correction:


Step 2
In this step we will make a grid floor. You can use grid brush or make your own using default photoshop tools but I use a stock image. Use Retangular Marquee Tool ( hit M to active it) to draw a square on floor part ( choose the part near foreground) as shown below:
Use Move Tool (V) to drag it into our main document. Resize and transform it by combine key Cmd/Ctrl+T:

After resizing, hit Cmd/Ctrl+Shift+U to convert this floor into black and white:

Change the mode to Overlay 100%. Add layer mask and use soft black brush with big opacity ( 200-300 px) to make the two edges faded into background:

Step 3
I add a slight cyan tone for picture by Color Balance. Go to Layer-New adjustment layer-Color Balance:
Step 4
Extract the girl from original and move her in to our canvas, resize and place her on the left side:
To add shadow for the girl, make a new layer under girl layer. Use soft black brush with diameter about 20-25 px to paint along her legs which meet background:

Call this layer as “shadow 1″.
To add more shadow for this girl on the floor, make a new layer ( under girl’s one). Use Elliptical Marquee Tool to make a selection under girl and set feather for it as 5:

Fill this selection with black:

Go to Filter-Blur-Motion Blur:

Lower opacity to 50%:

Name this layer “shadow 2″.
Step 5
Add layer mask for girl layer. On this layer, use Pen Tool to make a path on upper part of model head. It can be larger than the head ( not important):
Press Cmd/Ctrl+Enter to make selection for this path:

On layer mask of girl layer, use black brush with big hardness ( about 90%) to paint within this selection to remove upper head part:

Step 6
Create a new layer under girl and her shadows ones. Use Elliptical Marquee Tool to make a narrow selection on the top of model head then fill it with color #f9ba94 ( This color is picked from midtone of model skin):
Name this layer “top head 1″.
Make a new layer and make a smaller selection inside the top head. Fill it with color #b68568:

Step 7
I want to edit model and top head parts together so I group them. On girl layer, press Cmd/Ctrl+G to make group for it. Use Move Tool to drag all layers you want to edit into this new group.
Put the name of this group as “girl” also change the mode of it from Pass Through ( default mode group) to Normal 100%:

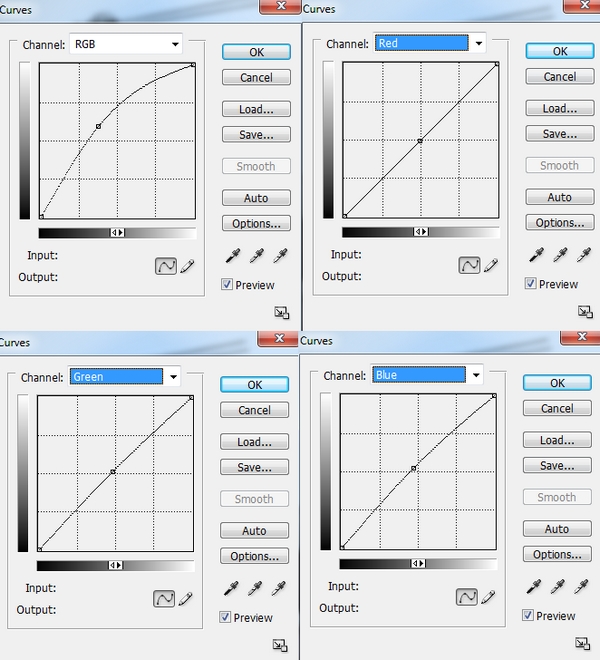
I use some adjustment layers to make color of model fit background. On girl layer, go to Layer-New Adjustment Layer-Hue/Saturation:
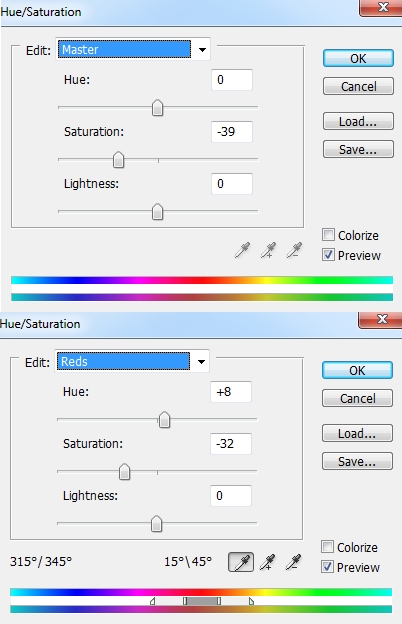
Layer-New Adjustment Layer-Curves:

Layer-New Adjustment Layer-Color Balance:

Because the mode of group changed to Normal 100% so these adjustment layers only affect the layer inside this group ( model, head parts):

Step 8
In this step I’ll add more hair for model to make a natural look. Create a new layer above girl group and change foreground color to black. It will be very easy with a graphic tablet but if you don’t have, you can use hair brush instead.Choose hard brush with 2 px ans hit F5 to make settings for it:

Draw a few, random tiny flying hairs for the parts you think missing. You can look at model original stock as a reference. Here is my result:

Step 9
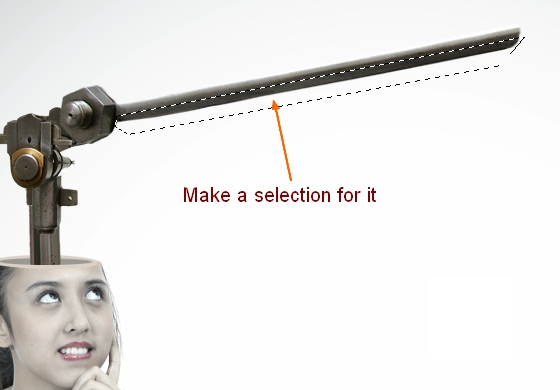
Since this step we’ll make a special coffee machine. Open machine parts stock with knuckles and iron bars. First isolate it from background and copy it into a new layer as we will use some parts of it:
On this new layer, make selection for a part as shown below:

Use Move Too to place it onto model head ( resize to fit):

Add layer mask and use black brush with big hardness ( 80-90% otherwise it will leave a soft unatural edges) to remove the top, bottom and create a look that this iron bar inside the head:

Call it as “machine part 1″.
Come back to machine stock. Choose this iron knuckle and and drag it into our picture, position above “machine part 1″. Apply Flip Horizontal for it ( Edit-Transform-Flip Horizontal):


Call it “machine part 2″.
Step 10
Choose another iron bar and situate it above two machine parts in previous step and apply Flip Horizontal for it. Use Cmd/Ctrl+T to make it a bit skewer:

Add layer mask for it to remove some parts as the screenshot below shows ( use hard black brush):

Call it “machine part 3″. On this layer, use Polygonal Lasso Tool (L ) to make a selection with hard edge:
Press Delete to clear this part:

Step 11
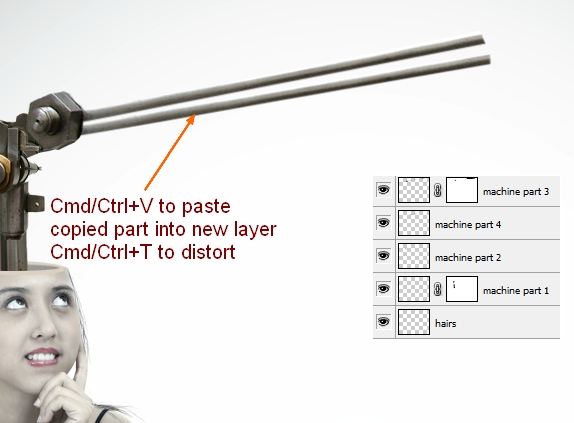
On machine part 3 layer, make selection for the iron bar and press Cmd/Ctrl+C to copy it. Make a new layer under this layer, press Cmd/Ctrl+V to paste copied part into this new layer. Use Cmd/Ctrl+T to distort it a bit. Call it “machine part 4″:
Come back to machine stock again. Use Elliptical Marquee Tool to grab a circle of a knuckle :

Position it at the knuckle of machine part 3 and name it as “machine part 5″:

Step 12
Make group for all machine parts layers as we did for girl’s ones and remember to change the mode to Normal 100%. I use two adjustment layers with Clipping Mask for machine part 5 to change color and brightness of it. On machine part 5 layer, go to Layer-New Adjustment Layer-Curves:
Hue/Saturation:
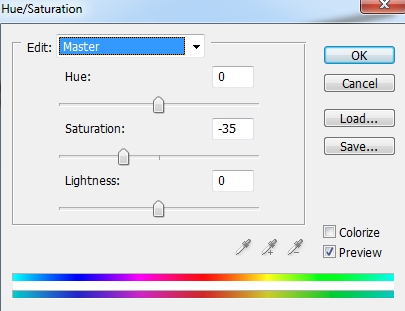

Add some adjustment layers for all machine parts layers.
Hue/Saturation:

Curves:

Use soft black brush with opacity about 50% to keep the iron bars not very bright:

Step 13
Open coffee bean stock. You can use your own image if you can’t download this photo. Make selection for the beans inside the cup:
Move it onto model head top and resize to fit the size of this part by transform tool ( Cmd/CtrlT):

Add layer mask and use black brush with big hardness to make a look below:

Name this layer as “coffee beans 1″.
Make a new layer under this layer. Use black brush with opacity about 60% to paint under these beans:

Step 14
Copy some beans from stock and place them on coffee beans 1:

Add some another beans to the floor and place them near to each other. You can use transform tool to make them not look the same. As you can count, I use 9 beans for this effect. Then I make group for all beans layers as done in previous step:

For all beans on the floor, I apply Drop Shadow effect for them:


Step 15
Make a new Hue/Saturation layer for these beans to desaturate them: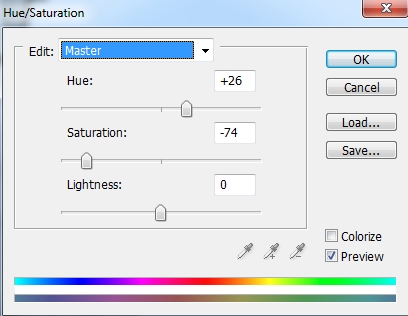

Step 16
Open pot and cup stock. Cut out the pot and and place it beside the iron bars of the machine. Use transform tool and flip it horizontally as shown below:
To change the light source of the pot to be fit the light of background, make a new layer with Clipping Mask for the pot ( look at step 12 if you don’t remember how to make layer with Clipping Mask). Hit G to active Gradient Tool and choose Linear Gradient with default color ( black and white ) and settings below. Drag a line from right to upper left:
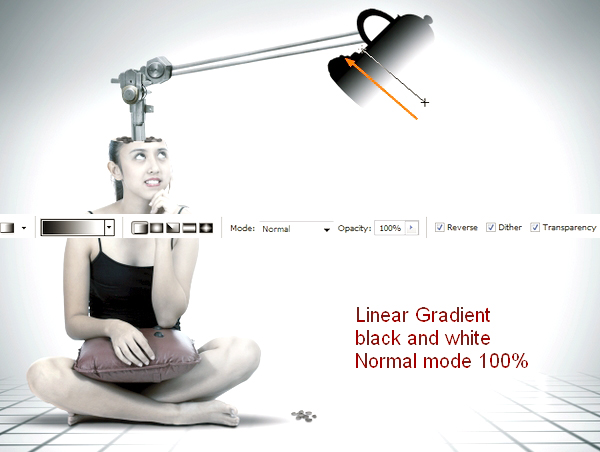
Change the mode to Soft light 100%. Add layer mask and remove the dark effect on the right and light effect on the spout of the pot:

Step 17
To brighten more this pot, make a new layer (Clipping Mask) and use soft white brush to paint on some dark part of it. Change the mode to Overlay 50%:

New layer (Clipping Mask) and I use brush with color #b0adad. Paint on the top of the spout and change the mode to Multipy 50% to make it more visible:

Change color of the pot by Color Balance layer ( Clipping Mask):


Step 18
Extract the cup and situate it on the right side of floor:
Make shadows for this cup on two layers as we did with girl. I lower opacity of shadow on floor to 60%:

Add two adjustment layers for the cup to change it’s color.
Hue/Saturation:

Curves:


Step 19
Create two new layers and use brush with color #8e795f to paint on the cup brim and handle. Put the mode of two these layers as Color Burn 100%. Call these layers “stain 1″, “stain 2″:
Step 20
Open stock with coffee pouring out from a pot. Make selection for coffee part inside the cup and copy it into our main picture, resize and place it onto the cup:

Add layer mask to remove the part out of the cup:

Name this layer as “coffee surface”.
Step 21
Come back to pouring coffee image. Take the flowing part and paste into our document. Resize and use transform tool ( Cmd/Ctrl+T) to get the look below:
Use layer mask to delete unwanted parts:

Call it as “coffee 1″.
Copy this layer several times ( mine is four times), distort them and place them to make a flow of coffee from the spout into the cup. Use layer mask to remove any unecessary parts:

Change the name of them from “coffee 2″ to “coffee 5″.
Step 22
Make group for this pouring coffee with the same method in previous steps. For the part nearest the spout ( “coffee 1″), I use a new layer with Clipping Mask and brush with color #baa068 painting on it as it need to be darker. Set the mode as Multipy 100%:
Add a Color Balance layer for coffee layers of this group:


Step 23
Open coffee foam stock. Make selection for the foam part inside the cup: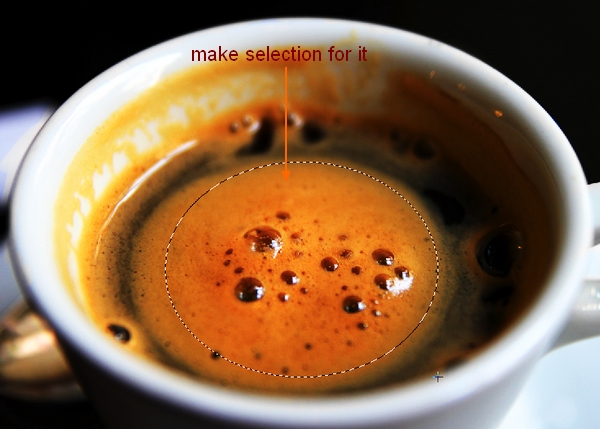
Move this part onto coffee part in our main picture and transform it as usual. Use layer mask to cancel the part out of the brim:

Name it as “coffee foam 1″.
Paste this foam again into our document but position it at the right edge of the cup. Use layer mask to remove the part covering the cup and trim the contour of this foam with very small brush size ( 6-7 px and hardness about 70-80%) to get a look of a coffee puddle:

Name this layer as “coffee puddle”.
Copy a part from foam stock again and place it along the right side of the cup. Mask out unwanted parts to get a look of coffee foam overflowing from the cup brim.


Rename it “coffee foam 2″.
Step 24
You can see color and brightness of coffee foam and puddle looks very different from the rest of picture. So I make group for them and add some adjustment layers to change their colors.Curves 1:

Hue/Saturation:

Color Balance:

Curves 2:

We have result:
I add a blank layer with Clipping Mask for coffee puddle layer and use brush with color #5c4529 to paint over the highlight of it. Change the mode to Multipy 20% and you can see this part becomes darker:


Step 25
Open splash stock. I choose this stock as it has a pretty similar color with coffee tone ( but of course, you can use your own image). I use Magic Wand Tool to isolate splash part and place it onto the cup ( resize as always). Use layer mask to get a fine look: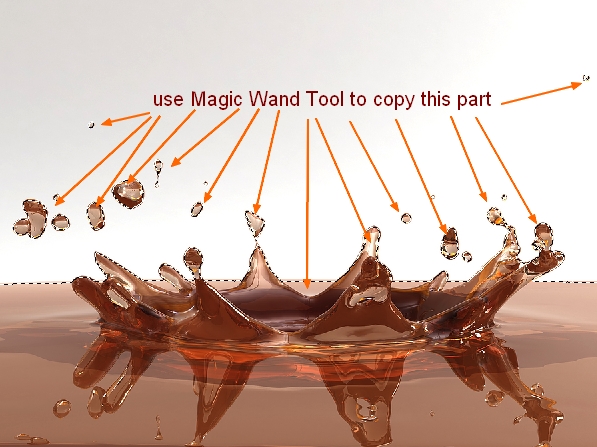

Copy some small splashes from this stock and move to our document, downsize it and place it at the left of splash:


Name these layers “splash 1″, “splash 2″.
Step 26
Make group for these splashes and change their colors with some adjustment layers.Color Balance:

Hue/Saturation:

Curves:


Step 27
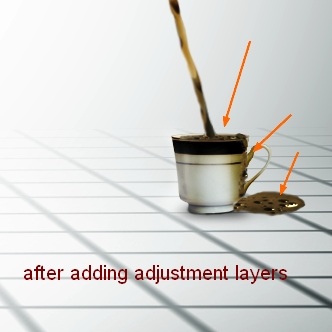
We finished adding all elements. Now it’s time for blending and coloring. Create two adjustment layers on the top.Curves:

Color Balance:


Step 28
Create a new layer and choose Radiant Gradient with default color ( black and white). Drag a line from center to bottom to get the look below:
Change the mode to Soft light 40%:

This step is to add more vignette effect for the picture.
Step 29
Create a new layer and brush with color #aeb6bd. Paint on the top of picture and set the mode to Multipy 50%:
Make a new layer with soft white brush to paint on the right side of model and left side of the cup to brighten them. Put the mode to Soft light 100%:

And We’re Done!
You can view the final outcome below. I hope that you enjoyed this tutorial and would love to hear your feedback on the techniques and outcome.


Tidak ada komentar:
Posting Komentar